
How To Reconcile Stripe Payments
This week I’ve had a few inquiries about reconciling Stripe transactions in Odoo. There’s not a lot of information available on the topic, so I thought I’d share our method for reconciling Stripe payments in Odoo.
First, Odoo integrates with Stripe. The integration does an amazing job of accepting Stripe payments and applying those payments to the appropriate invoices. But then what? Stripe merchant accounts will not integrate with Odoo like a bank or credit card account, so how do we reconcile the banking side of Stripe transactions in Odoo?
Oh Stripe.
Poor Stripe. My partners will tell you that when I first tackled this issue "Stripe" had me ready to retire the laptop and become a rodeo queen. To be fair though, it's not Stripe's fault. I can't even justify an "Oh Odoo," because it's not Odoo's fault either. Stripe isn't a bank or credit card and there are so many variables that Odoo leaves it up to each company to determine their best workflow. So let's just say "Oh Well" and get to the solution.
The steps may seem complicated, but once you do it the first time you'll be a pro. Our clients can do this whole import process in under five minutes. The high-level process is this:
● Import Stripe export as “bank statements” in the Stripe journal (<5 minutes, really).
● Reconcile the Stripe Journal just like you reconcile bank journals.
● Create an Internal Transfer from Stripe to your bank to record receipt of the
funds from Stripe.
Okay, Let’s Do It!
SETUP:
1. Configure Odoo:
a. Setup your Stripe integration in Odoo.
b. We setup Stripe with its own Bank Journal. This keeps everything clean and makes reconciling a bit easier.
i. Payments
and refunds recorded via the Stripe integration will flow into this journal
just like they do in your cash journals.
2. Configure your Stripe Merchant Account:
a. Setup Frequency of Funds Transfer:
Set the frequency of the funds transfer from Stripe to your bank account. This can be set to daily, weekly, or monthly.
b.
Define Custom Report Export:
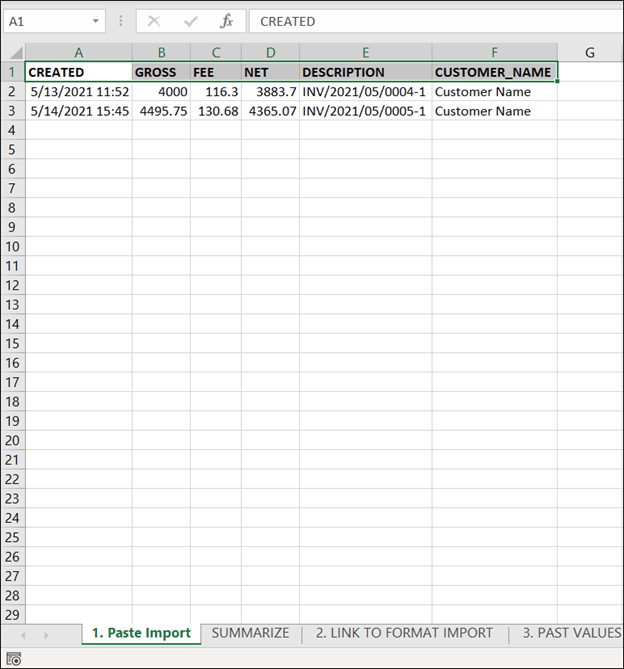
In your Stripe account you can define a custom export. The minimum fields you
will need are: Created Date, Gross, Fee,
Net, Description (this is the Odoo invoice #) and Customer_Name, but select any
other fields important to you.
i. After you export a custom report from stripe the first time, you should have the option to schedule the report, and Stripe will email it to you. Make your life easier and set this up.
ii. Schedule
this report to match the frequency of the funds transfer to your bank (daily,
weekly, monthly).
IMPORT TRANSACTIONS:
3. Import Stripe Statement:
Here is an Excel workbook to make formatting the Stripe export super easy. As a best practice, always save a new copy of
your import template before making any modification to it. When you receive the Stripe export via email you’re ready to import.
a. Open the Excel file named “Stripe Import Template” and save it with a new name. For example: “2021-09-07_StripeImport.xls.”
b. Paste Import Tab:
Copy the data from the Stripe Export onto the first tab (Paste Import) of the workbook.
i. Please note:>> If you added fields to your export you will need to modify this workbook template to accommodate those fields.
c.
Summarize Tab:
The workbook will automatically link this data to the SUMMARIZE tab. You
don’t need to do anything on this tab unless your Stripe export has more than
24 rows.
i. If your export has more than 24 lines, you will need to insert rows. Insert more rows (above row 25) and copy the formulas from Row 2 all the way down to the last row you inserted.
ii. This sheet is setup to link the data from the first tab, calculate the Statement Date, and format the transactions data and Stripe fees.
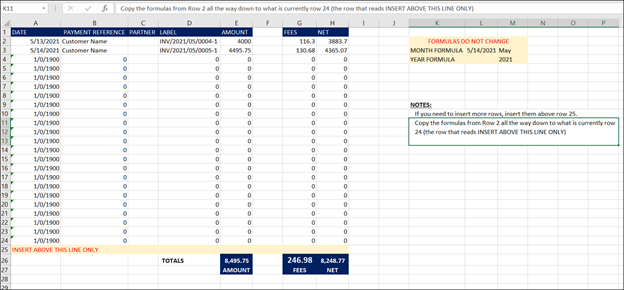
iii. The accountant in me wants to tell you to check the totals on this sheet to the totals on the export from Stripe. This
may save you a bit of work later if you forgot to insert enough rows or made a
mistake copying the formulas.
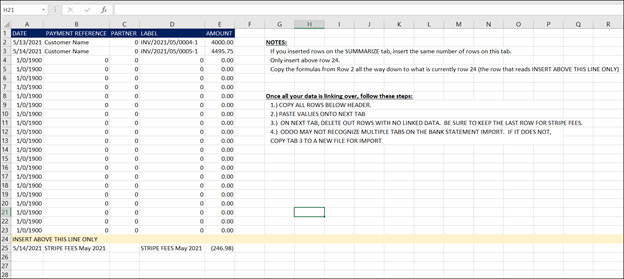
d. Link To Format Import Tab:
This sheet links the data from the “Summarize” tab and formats it like a bank statement. Again, you may need to insert rows.
i. Copy all the rows below the header and paste the values on to the last tab (PASTE VALUES FOR IMPORT).
e.
Import into Odoo:
Import the last tab of the
workbook into Odoo as a bank statement on the Stripe journal.
After you do this the first time all of step 3 should take you less than five minutes.
4. Reconcile the Stripe Journal:
a.
With your Stripe statements imported, you are able to
reconcile the Stripe transactions just as you would a regular bank
account.
5. Internal Transfer to Bank:
a. Create an internal transfer from Stripe to the bank in which Stripe deposits the funds. Your internal transfer amount will be the “Net Amount” calculated on the SUMMARIZE tab of the workbook.
Wahoo! It really is that easy.
Here is the link to the excel file again: Click here to download the Stripe Statement Import Template
If you have questions or need help, the whole team at Talus ERP is here to serve you. You can reach me directly at shelley.schultz@TalusERP.com or contact us via the links below.